The other day, I saw someone had mentioned that they owned a fancy sewing desk and I thought I’d share the plans and a few pics for the sewing desk that I made out of cabinets from Home Depot! I've been using this sewing desk for a few years now and it is so AWESOME to have a nice big workspace where I can sit and sew, or cut or iron or do crafts!
Supplies
Ready-to-Assemble or Pre-built floor cabinets in the following sizes (I got mine on clearance at home depot):
(1) 12” wide x 24” deep
(1) 18” wide x 24” deep
(2) 26” wide x 24” deep
4’ x 8’ sheet of Melamine for the top
Melamine edging
Screws or pocket screws
Optional: Cotton fabric & batting, Velcro, cutting mat
Desk Size & Layout
Instructions
If your cabinets aren’t pre-built then assemble them per the manufacturers instructions. Some of the ready-to-assemble cabinets have plastic legs on the bottom and you are supposed to put a kick-board in front to hide the legs. I chose to omit the plastic legs to make my desk a more comfortable height for me.
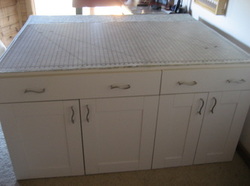
Arrange cabinets as shown in picture or to suit your taste. You’ll notice that I left an open area so I can set my sewing machine on the desk and sit at the desk. I also have a cabinet where I left the door off (open) since you can’t see it anyways and it made it easier to get things in and out of the cabinet.
Screw the cabinets together. My husband did the assembly for me (he’s so nice, heehee) and he used pocket-hole screws so everything would be nice and flush.
After you screw the cabinets together, measure the final size of the desk (mine is 48” x 52”) and cut the melamine to size. Use an iron to adhere the melamine edging to the cut edges of your melamine desk top so all edges look finished. Screw the cabinets to the melamine from inside the cabinets so that you can’t see the screws when you look at the desk.
Then just install your doors and drawers and your desk is done! Yay!
Additional Options & Modifications
Has anyone else made their own sewing desk? If so, put a link in the comments – I’d love to see it!
If your cabinets aren’t pre-built then assemble them per the manufacturers instructions. Some of the ready-to-assemble cabinets have plastic legs on the bottom and you are supposed to put a kick-board in front to hide the legs. I chose to omit the plastic legs to make my desk a more comfortable height for me.
Arrange cabinets as shown in picture or to suit your taste. You’ll notice that I left an open area so I can set my sewing machine on the desk and sit at the desk. I also have a cabinet where I left the door off (open) since you can’t see it anyways and it made it easier to get things in and out of the cabinet.
Screw the cabinets together. My husband did the assembly for me (he’s so nice, heehee) and he used pocket-hole screws so everything would be nice and flush.
After you screw the cabinets together, measure the final size of the desk (mine is 48” x 52”) and cut the melamine to size. Use an iron to adhere the melamine edging to the cut edges of your melamine desk top so all edges look finished. Screw the cabinets to the melamine from inside the cabinets so that you can’t see the screws when you look at the desk.
Then just install your doors and drawers and your desk is done! Yay!
Additional Options & Modifications
- The cabinets only come with one shelf and it is a half depth so I used leftover melamine to add 2 full depth shelves to each cabinet in place of the half depth shelves that came with them.
- I attached prettier cabinet handles than what mine came with.
- I hung a power strip inside one of the open cabinets so I can easily plug my machine or anything else in at the desk.
- I used batting and a piece of patterned cotton to make an ironing board cover for the desk so I can iron right on there if I want. It’s just a big square with the edges folded over and sewn. I used adhesive Velcro on the desk and sew-on Velcro on the fabric so that my ironing cover stays in place on the desk.
- Lastly, I bought a big cutting mat that covers almost the whole desk – there’s just enough room for my sewing machine on the other side of the desk so I can take off the cutting mat without moving my machine. You could also do ¼ of the desk top with ironing and ¼ or ½ of the desk top with a cutting mat so you have individual stations. It all depends on the room size and shape you have for your cutting desk and what you prefer!
Has anyone else made their own sewing desk? If so, put a link in the comments – I’d love to see it!


